Tweet

Wednesday, 16 October 2013

Soups Heaven

HOMEMADE CHICKEN NOODLE SOUP
CARAMELIZED BALSAMIC–RED ONION SOUP WITH CHEESE-TOPPED CROUTONS
CREAMY TOMATO-BASIL SOUP WITH PARMESAN FRICOS
CUBAN BLACK BEAN SOUP
CORN CHOWDER
WHITE CHEDDAR MASHED POTATO SOUP
HOT AND SOUR SOUP WITH FRESH SHIITAKE MUSHROOMS
CREAM OF SPINACH AND BROCCOLI SOUP
NORTH AFRICAN RED LENTIL SOUP
ROASTED BUTTERNUT SQUASH AND APPLE SOUP


The How of Soup
If you want to master the art of making a good home-cooked meal for yourself and the people in your life, soup is a perfect place to start. Soup fills your home with the welcoming smell of good things simmering, and in most cases it practically cooks itself, once you do a bit of initial ingredient prep. Why not just open a can? Well, when you’re pressed for time, there’s nothing wrong with that. But a little time making soup from scratch is a great investment that beats canned soup hands down.

Why?
  • It’s tastier because you’re in control of the ingredients and the seasonings, and you can choose what’s fresh and in season for the raw materials. 
  • It’s cheaper, especially when you consider that a big pot of soup can last for several meals or feed a crowd. 
  • It’s likely to be healthier, because the ingredients are freshly prepared and less chemically “enhanced.” 
  • It generally freezes and reheats well. 
  • It’s filling and soul-satisfying. 
  • And, best of all, it’s something wonderful you can take pride in having created—often from next to nothing. 
Soup is, generally speaking, ingredients simmered with water or broth—sometimes puréed, sometimes not—served hot (or sometimes cold). It’s about that simple. So, if you have a large heavy pot, a ladle, and something to purée with, even the tiniest apartment can be home to a great soup kitchen.

READ BEFORE YOU LEAP
There’s no single way to make soup, and some recipes involve a little more advance preparation than others. That’s why it’s important to read through any recipe in this chapter (and really, any recipe at all) before you start cooking—and especially before you decide to make it for the first time. That way, you’ll be able to gauge the timing, check what ingredients you need, and decide if this is one for tonight or something to try next weekend.

PURÉEING SOUP
Many soups are made by cooking ingredients like potatoes or vegetables in broth or water until they’re soft, and then puréeing them to achieve a thick, smooth consistency. A regular stand blender works well for the purpose, but an immersion blender is even better. Whichever way you go,
before you purée any soup, let it cool down a bit so you don’t get burned if any accidentally spills or splashes. Blender Ladle some of the soup into the blender, filling it no more than two-thirds full so the steam doesn’t blow the lid off when you turn on the motor. Put the lid on the blender, and then fold a kitchen towel in half and drape it over the lid (another very helpful safety measure to keep hot soup from splattering you). Put one hand on the towel and hold the lid down firmly before you turn on the motor. With the other hand, turn the blender on, setting it to its lowest speed (cranking it to “high” right away will probably pop the lid). Then increase the speed gradually to the highest setting. After a few seconds, turn off the blender and check to see if you’ve reached the consistency you’re looking for. If you want a chunky soup, it’s usually best to purée some of the soup completely and then combine that with the remaining unblended soup. (You can also simply purée all of the soup, “pulsing” the motor on and off a few times so the soup doesn’t get completely liquefied.) Because you’re puréeing in batches, you’ll need a large container, bowl, or a second soup pot to hold the blended soup as you work. When you’re done, pour everything back into the original cooking pot to reheat the soup; or for cold soups or ones you’re making in advance, let the soup cool in the container and then cover it and chill it in the refrigerator. Immersion blender Immersion blenders (also known as stick blenders) are among a handful of game-changing kitchen tools. So if you’re liking the idea of making soup a more regular part of your life, I highly recommend you rush out and buy one. They’re not that expensive, and they have several advantages over a conventional blender: There’s no second bowl or pot to dirty up, because the puréeing happens right in the soup pot. They’re easy and fast to use, because you don’t have to work in batches. They allow you to see just how puréed everything is getting, so you can stop the minute you’ve achieved the texture you want. And they’re easy to clean and don’t take up much space. Convinced?
To use an immersion blender, take the pot off the stove and set it somewhere stable. Submerge the business end of the immersion blender completely into the soup, holding it straight up with the base flat against the bottom of the pot. To avoid splattering and over-blending, turn on the motor to the lowest setting and then gradually increase the speed. Then simply move the blender around, always keeping the base flush with the
bottom of the pot and the blade submerged. Food processor You can use a food processor fitted with the steel blade attachment to purée some soups, but for very liquidy ones it really doesn’t do as good a job as a blender or immersion blender. If you do use one, work in batches and avoid filling the bowl of the processor more than two-thirds full. Potato masher Yes, the lowest-tech option of all works quite nicely when you want a somewhat puréed but still fairly chunky texture. Just mash (gently, to avoid splashing) until you like what you see.

GET THIS SOUP SUPPLIES
Keep these staples around so you can make soup any time by rounding up a few good vegetables:
  • Broth in boxes (various vegetable broths, plus maybe some chicken)
  • Bouillon cubes
  • Canned beans
  • Canned tomatoes
  • Tomato paste
  • Dried thyme, oregano, cumin, and red pepper flakes
  • Olive oil
  • Garlic and onions
  • Soy sauce
  • Toasted sesame oil
  • Parmesan cheese
  • Rice
  • Soup pasta (such as orzo or little stars)

STOCK OPTIONS
When a soup calls for stock or broth, I recommend using the kind that comes in boxes because it tastes much better than canned. Look for a good organic brand. They’re all quite different, so shop around until you find one you like. For those emergencies when you run out of broth, keep some bouillon cubes on hand.

STORING SOUP
To store soup, let it cool, transfer it to an airtight container, and put it in the refrigerator. Stored in this way, most soups will keep for 3 to 4 days. Most soups also freeze well. A handy way to do this is to let the soup cool and then put individual portions in resealable plastic freezer bags. That way you can put one in the refrigerator to thaw in the morning (never thaw soup, or anything, at room temperature—it’s not safe, bacteriologically speaking) and it will be ready to heat up when you come home from work. Press most of the air out of each bag and lay it flat in the freezer until it has frozen solid. You can also freeze soup in plastic containers with airtight lids. Liquids expand when they freeze, so leave about half an inch of space at the top. Always label bags or containers with the kind of soup and the date (permanent markers work best). If a soup has lived in your freezer for more than 6 months, throw it out. Soups that tend to be freezer-challenged are those made with dairy, eggs, and/or lots of puréed potatoes. Freezing tends to make them break apart and take on a mealy or watery consistency. So don’t freeze these.

STYLE IT
The aesthetic and psychological impact of a simple garnish can’t be overstated. Set aside some of the herbs used in making a soup to top each serving. Or add a dollop of sour cream, yogurt, crème fraîche, or salsa, or a drizzle of good olive oil. Grated Parmesan or crumbled feta or goat cheese works well with many soups. And for crunch, sprinkle a few croutons or crumbled tortilla chips on top.

GO-WITHS ROUNDING OUT A SOUP MEAL
Soup can definitely be a one-bowl meal. But depending on your appetite and your mood, you might want to add a little something to round out the menu.
  • SALAD Match the dressing to the style of the soup. I’ve given you some recommendations with the recipes (kind of like wineand- food pairings, except it’s soup-and-salad pairings), and you can take it from there.
  • For a filling, nutritious, and inexpensive dinner, simply ladle some soup over a bowl of cooked rice. 
  • A vegetable or potato side dish
  • SLICED TOMATOES Drizzle with olive oil, feta, olives, and herbs.
  • GREAT BREAD Warm or toast a few slices of crusty bread or cornbread—store-bought or homemade (see Chapter 4: Vegetarian Entrées).
  • Sliced deli meats
  • Some good cheese

roasted garlic paste
A GREAT INGREDIENT FOR SOUP
Makes 6 tablespoons
This recipe is vegan.

Roasting garlic completely transforms its flavor. It’s still pungent, but the sharpness is greatly softened. Use Roasted Garlic Paste for mashing into soups, potatoes, sauces, or dressings—also for spreading on crackers or little toasts as an appetizer; topping grilled chicken, fish, or steak; or tossing into cooked vegetables. This will keep well (packed into a small, tightly covered container and topped with a slick of olive oil) for up to 3
weeks in the refrigerator—or indefinitely in the freezer. (Never store it at room temperature—it needs to stay cold.) 3 whole heads of garlic 3 tablespoons olive oil, plus a little extra

1. Adjust the oven rack to the center position (if using a full-size oven) and preheat the oven (or toaster oven) to 375°F. Line a small baking pan with foil.
2. Slice off and discard the very topmost tips of each garlic head. Stand the heads, cut side up, on the foil. Carefully pour about 1 teaspoon of the
olive oil onto the cut surface of each head. Roast for 30 to 40 minutes, or until the bulbs feel soft when gently pressed. (Larger bulbs will take longer.)
3. When cool enough to handle, break each bulb into individual cloves and squeeze the pulp onto a plate. Use a fork to mash the garlic, gradually adding the remaining olive oil as you mash. Use right away, or refrigerate or freeze with a little olive oil until use.

VEGETABLE CHOPPING GUIDE

As you become increasingly comfortable and adept at chopping, cooking will feel more and more fluid, like a dance. (Go ahead and put on some music!) Be sure to use a very sharp knife (see Get Cooking), go slow, and pay careful attention while you work. (Don’t try to motor your way through at the speed of light, as some of the cool chefs seem to do on TV. Please!) Always maneuver whatever item you are cutting into the most stable position on the cutting board (for example, flat side down after an initial cut—or just plain hold it very steady with your non cutting hand), in order to keep things safe. (An escaping morsel can lead to your slicing your hand instead!) For vegetables not covered in this guide, use the same principles as those on the following pages. This process will become familiar to you soon enough. Have fun!

Cut in half

lengthwise
BELL PEPPER Cut in half lengthwise • Cut out and discard stem, seeds, and inner membranes • Slice lengthwise into strips (thicker for
diced; thinner for minced) • Cut across the strips to dice or mince


BROCCOLI Cut off and discard base (bottom inch or so) • Use peeler to shave tough skin from remainder of stem • Cut on slight diagonal
into stalks and florets • For chopped broccoli, cut across stalks and florets into smaller pieces


CARROT Peel • Cut off and discard stem end • Cut across into 2-inch sections • Slice sections lengthwise into flat, wide pieces • Slice
each piece lengthwise into strips • Cut across the strips to dice
…and this is how to just plain slice one


 GARLIC Separate bulb into cloves • Lay clove on its side and smack with side of knife to loosen skin • Remove and discard skin • Slice

into thin strips and then cut across the strips (and/or every which way) to mince


GARLIC Separate bulb into cloves • Lay clove on its side and smack with side of knife to loosen skin • Remove and discard skin • Slice
into thin strips and then cut across the strips (and/or every which way) to mince


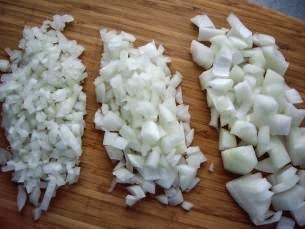
ONION Remove and discard peel and ends • Cut in half from top to bottom • Slice into strips (thicker for chopped; thinner for diced;
thinnest for minced) • Cut across the strips to chop, dice, or mince


PARSLEY/CILANTRO Remove and discard large stems • Chop the rest, picking out and discarding any larger stem remnants as you go
(okay to leave in smaller stems)


SCALLION Remove and discard ends and any limp or damaged greens • Slice the white part lengthwise two or three times • Cut across to mince
For rounds or ovals, skip the lengthwise cuts, and make thin slices across (diagonal for the greens)

Get the Gear

Equipping a kitchen for good, basic, fun cooking is less daunting than you might think. Start with the essentials, and go slow accumulating the rest. Remember that you don’t need to buy the newest and the fanciest tools—or even anything new at all. Scour garage sales and thrift shops. And let all your relatives and friends know that you are in the exciting process of setting up a serious(ly fun) kitchen, so that they will keep you at the top of their hand-me-down list whenever they upgrade. Remind them, also, of your birthday, and promise to invite them often for dinner. That should help. Here’s a starter list that should pretty much get you through every recipe in this book.

KNIVES
Chef’s knife: This is where it all begins. You can—and should—do most of your slicing, dicing, chopping, and mincing with a single knife. It’s known as a chef’s knife or utility knife, and has a blade that’s 6 to 8 inches long, without serrations. A good knife is one that feels comfortable in your hand, heavy enough to let you chop assertively but light enough to work with easily. There are many styles and options, and you need to find the one that feels right to you, but this is a good place not to scrimp, so visit a cookware store and get some advice.

Paring knife: You will also want a sharp paring knife (also straight-bladed, not serrated), which is way smaller than the chef’s knife and thus invaluable for cutting diminutive things (like shallots) or doing fine work (like peeling and seeding fruit and vegetables).

Honing steel: High-quality knives will last you a lifetime if you maintain them properly. To that end, you’ll want to invest in a knife-honing steel. This is a long rod with a handle. Here again, get advice at the cookware store, and ask for a demonstration. Use the steel to hone your knife frequently, and if you notice that the blade is getting dull and the steel isn't helping, take your knives to a professional sharpener. It’s a good idea to do this once or twice a year, depending on how much of a workout your knives get. Bread 

knife: A long-bladed serrated bread knife is good to have for slicing bread. A high-quality bread knife will stay sharp for years. It can’t be honed on a steel, but you can have it sharpened professionally. And speaking of serrated knives, you might also want to have a smaller one on hand for cutting citrus and tomatoes.

CUTTING BOARDS
Buy a few wood or plastic cutting boards—you can’t have too many, and they take up very little space. I recommend having a dedicated one for onions, garlic, and shallots, as these flavors are difficult to get rid of and tend to keep imparting themselves to other things that get cut on the board long after the fact. That’s okay for vegetables, but really frustrating when your fruit salad is inadvertently seasoned with a hint of garlic. You should also have a separate plastic board for raw meat, poultry, and seafood to avoid cross-contamination with other foods. Make sure you clean it with soap and hot water—and thoroughly dry it—after each use.

SOUP POT OR DUTCH OVEN WITH A LID
You will use this a lot! Let it double as a pasta cooking pot to save cupboard space. The pot and its handles and lid need to be ovenproof; you will often start a recipe on the stove top, and then cover the pot and put it in the oven. Since you’ll often be browning things in this pot as a first step, it’s essential that it have a heavy bottom. (A thin metal pot will scorch food rather than browning it evenly.) Look for a substantial pot, such as one made of enameled cast iron, and treat it with respect, using wooden utensils to avoid scratching its surface.

SKILLETS
A 10-or 12-inch skillet is likely to be one of the most used pieces of equipment in your kitchen, so here again buying a good one matters. That doesn't mean it needs to be expensive. A cast-iron skillet will work well. If your skillet comes with a lid, all the better. If it doesn't, look for a heavy lid that will fit it (garage sales and thrift stores are sure to have a selection). A 6-to 8-inch skillet is handy for cooking eggs and small amounts of food. It’s good to have both sizes.

OTHER POTS AND PANS
You will need a medium-sized (around 2-quart) saucepan with a tight-fitting lid and a heavy bottom, a 9-by 13-inch baking pan (metal or glass), and a few good, heavy baking trays.

WAFFLE HEAT ABSORBER
This is a small, round, corrugated metal insulation pad, also known as a Flame Tamer or heat diffuser, that you can put under a pot on the burner. It allows your lowest setting on the stove to become even lower for long simmering of foods, like rice and soup, that you want to cook through very slowly without burning them on the bottom.

OVEN MITTS AND POT HOLDERS
Keep these near the stove, in a drawer or hanging from a hook—and make sure they stay dry. If they get wet, they’ll conduct heat and this will painfully (to you) defeat their purpose.

BOWLS
Collect various sizes from large to small—and various shapes (deep and shallow) for marinating, tossing, beating, combining, and serving. Nesting sets are nice for space-saving. And in general, when it comes to bowls, between holding ingredients, mixing, and serving, you can’t have too many.

COLANDER
Your colander should be large enough to drain a batch of pasta. You might also want to have a smaller one for washing and draining small amounts of vegetables, fruit, herbs, or other ingredients—or use a strainer for this purpose.

STRAINER
A medium-mesh strainer is useful for everything from sifting powdered sugar over foods to draining and rinsing a can of beans.

WOODEN SPOON SETS
These are very inexpensive and effective. Usually these sets come with several wooden spoons and a few wooden spatulas. I use them all the time. It’s handy to keep them in a pitcher or vase by the stove for easy grabbing. Keep some whisks, tongs, and other frequently used items in there as well.

RUBBER SPATULAS
They’re cheap, so get a few of various dimensions. Invest in heatproof ones, which cost a bit more but won’t melt into your scrambled eggs.

THIN-BLADED METAL SPATULA
This tool is indispensable for when you want to loosen and then flip a burger or other skillet food and don’t want to leave any of the crisp parts in the pan.

WHISKS
Get yourself a set of whisks—small, medium, and large—and you’ll be able to handle anything from whipping cream to whipping up a salad dressing.

TONGS
Spring-loaded tongs that you can use with one hand are indispensable. Watch any professional cook in action, and you’ll see why.

SCISSORS
Buy a pair to use just for food and keep them in your kitchen drawer. You will be surprised at how much these will get used—from snipping chives and other herbs to cutting fish and poultry. Like your knives, your kitchen scissors will last longer and perform better if you have them professionally sharpened from time to time.

LADLE
Get a 4-to 6-ounce ladle for soups and stews and for ladling pasta water from the pot into a sauce.

GARLIC PRESS
When you see a recipe that calls for minced garlic in this book, you can either mince it with a knife or press it through a garlic press, which saves time.

BOX GRATER
A good, heavy-duty box grater is indispensable for grating everything from vegetables and potatoes to cheese.

MICROPLANE GRATER
These ultrasharp graters, sold in cookware stores, are fabulous for fine-grating citrus zest and ginger, hard cheeses like Parmesan, and chocolate (for sprinkling on desserts or drinks as a garnish).

PASTRY BRUSH
Useful for spreading olive oil on baking trays or brushing food with oil or melted butter.

VEGETABLE PEELER
Look for a good, sturdy one, either Y-shaped or straight. A cheap, flimsy peeler will slow you down and won’t do as thorough a job.

INSTANT-READ THERMOMETER
If you will be cooking meat or chicken, this is your “when is it done?” insurance policy (see Chapter 6: Chicken, Fish, and Meat).

MEASURING SPOONS
Treat yourself to a nice, heavy-duty set. Actually, treat yourself to two. I find that having two sets really helps when you are measuring both dry and wet ingredients in one go-round and you want to keep them separate.

DRY MEASURING CUPS
These are used to measure dry ingredients, such as flour, and have flat edges, so that you can fill them and then scrape the excess off with the back of a knife blade. This gives you a more accurate measure for dry ingredients than a liquid measuring cup (see below).

LIQUID MEASURING CUPS
These are usually made of glass with measurement lines on the side. Get two heatproof glass ones with spouts for pouring—one 2-cup and one 4- cup capacity. These can be used both for measuring and for heating/melting ingredients (like milk or butter) in the microwave.

OTHER HELPFUL TOOLS AND GADGETS
Salad spinner
Dish towels
A heavy-duty apron or two
Citrus juicer or reamer
A hardworking peppermill

ELECTRICAL APPLIANCES
Blender and/or immersion blender (see Chapter 1: Soups)
Hand-held electric mixer
Toaster oven
Microwave

FOR STORAGE
Containers: Collect food containers with tight-fitting lids in various sizes (store them stacked, with covers in a shoebox on the side). This is better for the environment than using plastic bags and plastic wrap. Also, save those plastic tubs with tight-fitting lids—the ones left over from when you binged on a bulk cookie purchase at the club store. They’re great for storing grains, beans, nuts, and dried fruit, and they stack well for space saving. 
Jars with lids: Wash and save jars. Small ones are great for storing all your brilliant homemade salad dressings. Larger ones are perfect for keeping dried fruit and nuts, or beans, lentils, and grains. 
Resealable plastic bags: Lay in a supply of freezer-weight and regular-weight bags in various sizes. (If this goes against your environmental values, just stick with the leftover containers, above.) 
Plastic bags: If the ones you brought home from the produce section or the farmers’ market are clean and dry, keep them for further use. 
Large coffee cans: Clean them out when the coffee is gone, and use them to store those plastic bags you saved. 
Permanent markers: Keep a few around for labeling whatever you are storing, with both the item name and the date. You might think this is overkill, but you will later thank yourself for doing this, I promise. 
Aluminum foil and plastic wrap: These take turns being indispensable. 
Shoeboxes: These are great for storing small bags of spices bought in bulk (which reminds me to recommend that you look for specialty food stores that sell spices in bulk, by the ounce, which will save you lots of money over time).

SPECIALTY FOODS
I will often suggest small touches of certain special ingredients—often as get creative additions to the recipes. Note that these are “special” and not “essential.” Here’s some useful information about them, so you can stock up to the degree that your wallet allows. But first, before we get to the fun part, a few words about oil.
You will be cooking with oil a lot throughout this book. Your standard, everyday workhorse oils will, in most cases, be olive oil (choose a nottoo- expensive extra-virgin) plus a second, more neutral-tasting oil, to use when olive flavor is incompatible with the dish. For this second oil, I recommend canola, soy, or peanut oil. Occasionally, but not often, I will also include some butter (which vegans can simply omit). So these are your
daily heavy lifters. Onward to the flavoring ones.

High-quality olive oil: There are many, many imported and domestic olive oils on the market these days, ranging from “pure” to “extravirgin.” As I mentioned above, I recommend using a not-too-expensive extra-virgin for everyday cooking and salad dressings, and keeping an extraextra special one around for special-occasion finishing and drizzling (recommended throughout the book). A small drizzle can have a large and good effect, so you can use this economically.

Toasted sesame oil: This dark Chinese flavoring oil is sold in the Asian foods section of supermarkets. All I want to say is “please get some”—it’s that good, and that important an ingredient. Other roasted nut and 

seed oils: These profoundly flavorful seasoning oils (which include walnut, almond, hazelnut, pistachio, and pumpkin seed oils) are not for cooking, but rather for drizzling onto your cooked food as a “flavor finish” or to supplement the olive oil in salad dressings. You can also use them as a dunk for fresh bread to create an exquisite appetizer, soup accompaniment, or quick snack. Keep all oils stored in a cool, dark place—or in the refrigerator. This is especially true for the “gourmet” ones, so they will stay good over the period of time you are parceling them out. Pure maple syrup: No imitations, now or ever, or you will go to culinary jail. Actually, I’m only somewhat kidding. If you love maple syrup impersonators on your pancakes, I won’t tell you to stop using them there. But please don’t cook or bake with them.

Vinegars: Store these in your cupboard (they keep indefinitely): cider vinegar; a decent, moderately priced balsamic; red wine vinegar; seasoned rice vinegar (make sure the label says “seasoned”). From there, you can experiment with fancier varieties, such as sherry, raspberry, and so on. Pomegranate molasses: This sweet-tart-tangy syrup made from reduced pomegranate juice is available at Middle Eastern food shops and in the imported foods section of many grocery stores. It keeps forever in your cupboard, and a little bit goes a long way, adding flavor and bright color to Middle Eastern dishes and all kinds of other foods, from salads and grilled chicken to yogurt and cheese.

Dried fruit: Keep a supply of dried apricots, prunes, figs, dates, cherries, cranberries, and blueberries (as well as other, more exotic dried fruit, such as pears, papayas, and chili-dusted mango) on hand to liven up salads, grains, entrées, and desserts. 

“Designer” salts: Fancy salts harvested from the sea and mined from the land are becoming more popular all the time. As an alternative to ordinary table salt, kosher salt has a pure, clean flavor and somewhat coarse grains, and it’s a great multipurpose choice that goes anywhere, including the rim of a margarita glass. Sea salt tends to have a more assertive flavor than kosher salt and can be fine or coarse. Specialty salts, like fleur de sel, gray salt, black salt, and pink salt, tend to have a coarse, crunchy texture, which makes them a good choice for “finishing”—that is, sprinkling on dishes like salads or vegetables at the very last minute, so their texture and intense hit of saltiness stand out. Then there are flavorinfused options, like smoked salts and truffle salts. And of course, there’s only one way to know which of any of these you’ll like: buy a few and start experimenting.

Get Preppy
Most cooking involves an initial preparation phase, in which you cut stuff up. Check out the prep videos at get-cooking.com for quick lessons in the best way to handle most vegetables. And in the meantime, on Get Cooking is a quick reference guide to basic prep techniques you’ll be using to make the recipes.

Getting Started

So where to begin? Well, before you do anything in the kitchen, the best advice I can give you is to read—and I mean really read—each recipe well, visualizing everything as you do so. And don’t do this as you’re rolling up your sleeves to get started, but much earlier, at the point when you’re deciding what to make and laying out a game plan. Studying the recipe will give you a sense of what ingredients you need to buy, whether you have all the right equipment, and how long the whole process will take. In these recipes, I've given you a heads-up each time something needs to be done in advance (especially when there is a waiting period for something to cool down, chill, or warm up to room temperature). Take the time to familiarize yourself with a recipe before you start, and you’ll be cooking from the driver’s seat instead of by the seat of your pants. I strongly recommend that you get all the ingredients for each recipe completely prepped and ready before you start the actual cooking. Lay everything out (having a lot of containers helps) in an organized fashion near the stove. Get your tools handy, too. In most recipes I've been pretty specific about the best tools to use, so again, if you read through first, you’ll find embedded set-up information. The better set up you are, the more fun you’re going to have once you turn on the stove.

There’s another really important streamlining habit I strongly encourage you to develop: Try to clean up as you go. This is especially helpful if your kitchen is small. After you’re done prepping the ingredients and you have them all lined up in their respective containers by the stove, clean the knife and cutting board, and put away anything you’re finished using. Wipe down the counters, wash your hands, and take a deep breath. Now, proceed to the cooking phase.

What about the big, possibly overwhelming uber-cleanup awaiting you at the other end? Try to minimize it by keeping a tub of warm, soapy water in the sink. As soon as you’re done with a dish or a utensil, just clear it of debris (compost bin, anyone?) and slip it into the tub. The exception is sharp knives, which should be kept separate so you won’t accidentally slice your hand under the suds. Rinse the stuff later; just get it soaking for
now. It will make a big difference.


Tweet